> ## Documentation Index
> Fetch the complete documentation index at: https://developers.partoo.co/llms.txt
> Use this file to discover all available pages before exploring further.
# Custom Fields
> Add and configure your own custom data fields.
Custom Fields allow you to extend your businesses with additional data beyond the standard Partoo fields. They are organization-specific, fully configurable, and can be tailored to meet your company's unique business requirements.
## What are Custom Fields?
Custom Fields are configurable fields that can be defined in addition to the standard business fields provided by Partoo. They are unique to your organization and can be adapted to suit your company's specific needs.
They provide a flexible way to save custom data related to your businesses, storing any additional information that's important to your organization beyond the default available business data fields. You can create, update, and retrieve this data through the main App UI as well as our REST API for seamless integration with your existing systems and workflows.
Custom Fields support a variety of data types. They integrate seamlessly with the business management interface, appearing in the Business Edit view based on their configured order. They are also included in REST API responses when retrieving business details.
### Use Cases
Data saved in Custom Fields is never sent to any third parties such as Google, Meta, or Apple. Custom Fields are intended for your internal use only, providing a flexible way to store and manage extra information about your businesses.
Custom Fields can be used for any purpose, here are some common use cases:
* **Data Storage**: Store extra business attributes that are important to your organization but not covered by standard fields. Examples include store manager names, special amenities, or operational details.
* **Integrations**: Send and receive Custom Field data using our REST API to support any sytems you use in your organization, such as store locators, inventory systems, CRM systems, etc.
* **Any other data-related use case**: Anything else you can think of! There is no fixed purpose for Custom Fields beyond providing a flexible way to store and retrieve additional business data.
In the end, you decide what data to store in Custom Fields and how to use it within your organization.
### Supported Field Types
| Type | Description | Available Constraints | Additional Required Fields |
| ----------------------- | ---------------------------------------- | ----------------------------------------- | --------------------------------------------------------------------------------------- |
| `BOOLEAN` | True/false values | None | |
| `TEXT` | Text strings | Optional max length | |
| `INTEGER` | Whole numbers | Optional min/max values | |
| `FLOAT` | Decimal numbers | Optional min/max values | |
| `SINGLE_SELECT` | Single choice from predefined options | Optional `max_selected_values` | Requires `possible_values` array |
| `MULTIPLE_SELECT` | Multiple choices from predefined options | Optional `max_selected_values` | Requires `possible_values` array |
| `MULTIPLE_SELECT_IMAGE` | Multiple image choices with labels | Optional `max_selected_values` | Requires `possible_values`, `possible_images_urls`, and `possible_images_labels` arrays |
| `IMAGES_UPLOADER` | Image upload with text fields | Configurable text fields with max lengths | |
### Field-Specific Configuration
#### Selection Fields with Option IDs
For select field types (`SINGLE_SELECT`, `MULTIPLE_SELECT`, and `MULTIPLE_SELECT_IMAGE`), the system automatically manages option identifiers:
* **`possible_ids`**: An array of unique identifiers corresponding to each option in `possible_values`
* **Automatic Management**: IDs are automatically created when adding new options and deleted when removing options
* **Read-Only**: These IDs cannot be manually modified - they're managed automatically by the system
The `possible_ids` field works alongside `possible_values` to provide stable
references to select options, ensuring data consistency even when option
labels change.
#### Option Ordering
For select field types (`SINGLE_SELECT`, `MULTIPLE_SELECT`, and `MULTIPLE_SELECT_IMAGE`), you can control the display order of options:
* **`possible_orders`**: Optional array of integers specifying the display order of each option in `possible_values`
* **Flexible ordering**: Each integer corresponds to the position preference for the option at the same index
* **Example**: `[3, 1, 2]` would display the second option first, third option second, and first option third
* **Order normalization**: Orders with "holes" are automatically simplified - for example, `[5, 8, 1]` will be returned as `[2, 3, 1]`
When creating or editing fields with custom ordering, ensure the
`possible_orders` array has the same length as `possible_values`, or leave it
as `null` to use default ordering.
#### Selection Constraints
For select field types, you can limit the number of selections:
* **`max_selected_values`**: Optional constraint limiting how many options can be selected
* **Applies to**: `SINGLE_SELECT`, `MULTIPLE_SELECT`, and `MULTIPLE_SELECT_IMAGE` field types
* **Default behavior**: No limit (users can select all available options for multiple select fields)
* **Business validation**: When editing businesses, users cannot select more options than the configured maximum
### Sections and Organization
Custom Fields can be organized into sections to group related fields together. Sections have:
* **Name**: Unique identifier for the section
* **Slug**: Optional unique identifier for the section
* **Order**: Display position in the interface
Fields within sections also have individual ordering for precise layout control.
## Managing Custom Fields through the App UI
The Partoo app provides an intuitive interface for managing your organization's custom fields. You can access custom fields management by navigating to **Settings > Integrations > Custom fields**.
### Accessing Custom Fields
Navigate to the custom fields management page through the main settings:
1. Go to **Settings** in the app sidebar
2. Select **Integrations** from the settings menu
3. Click on **Custom fields**
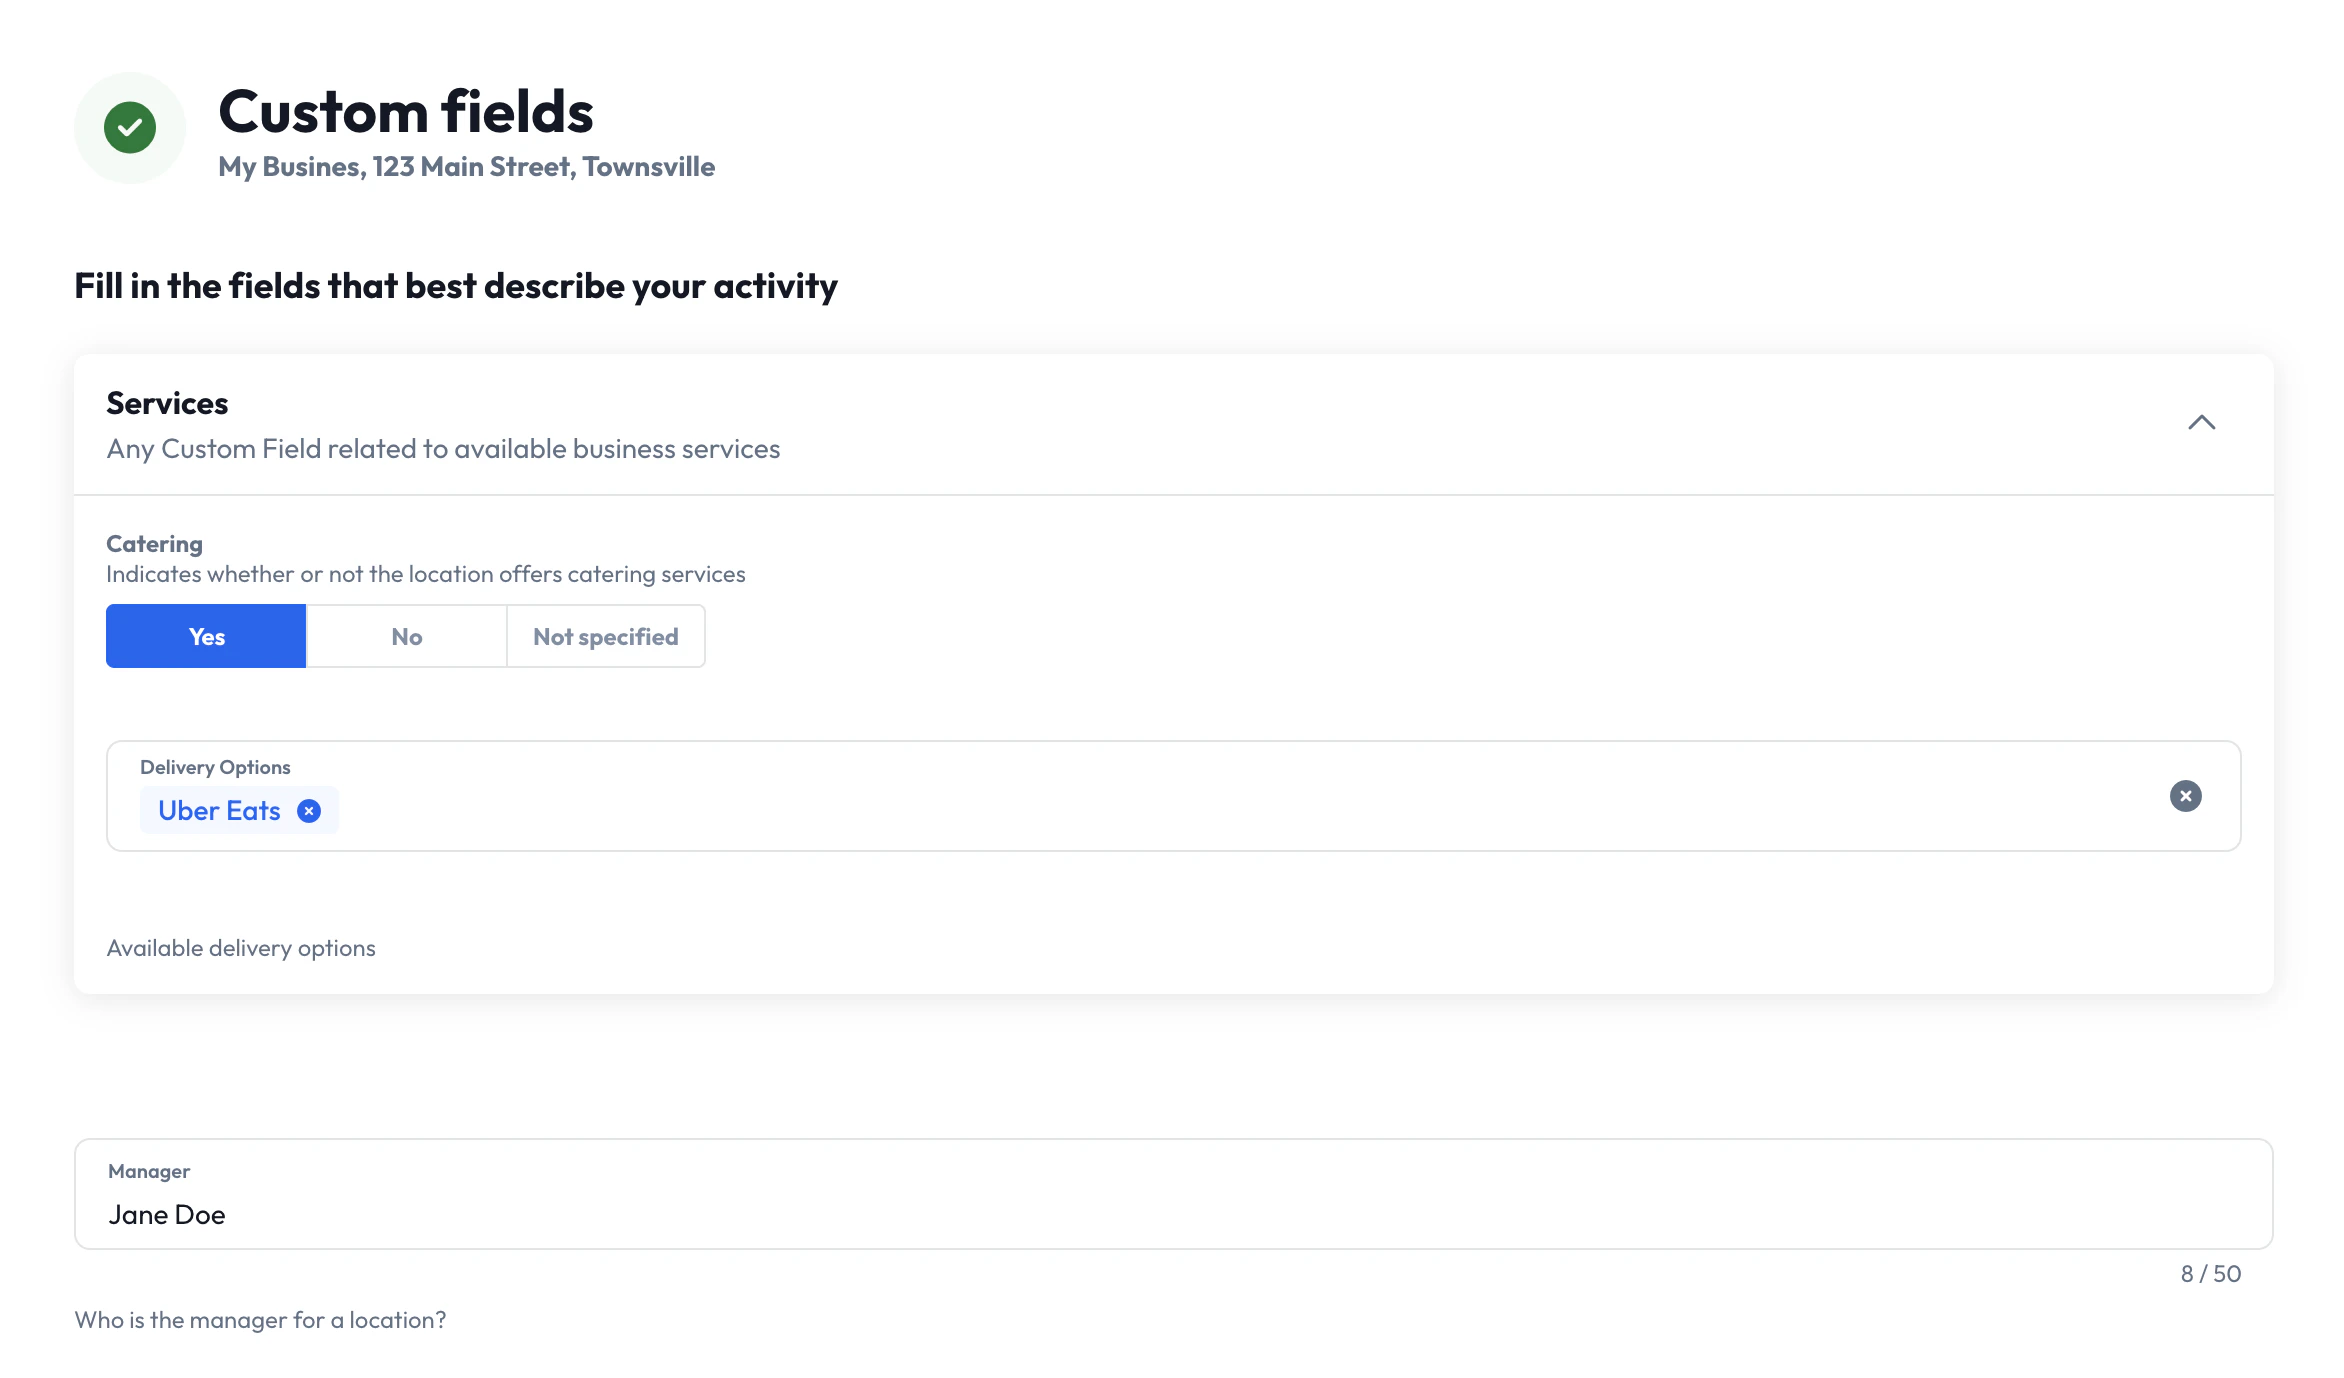
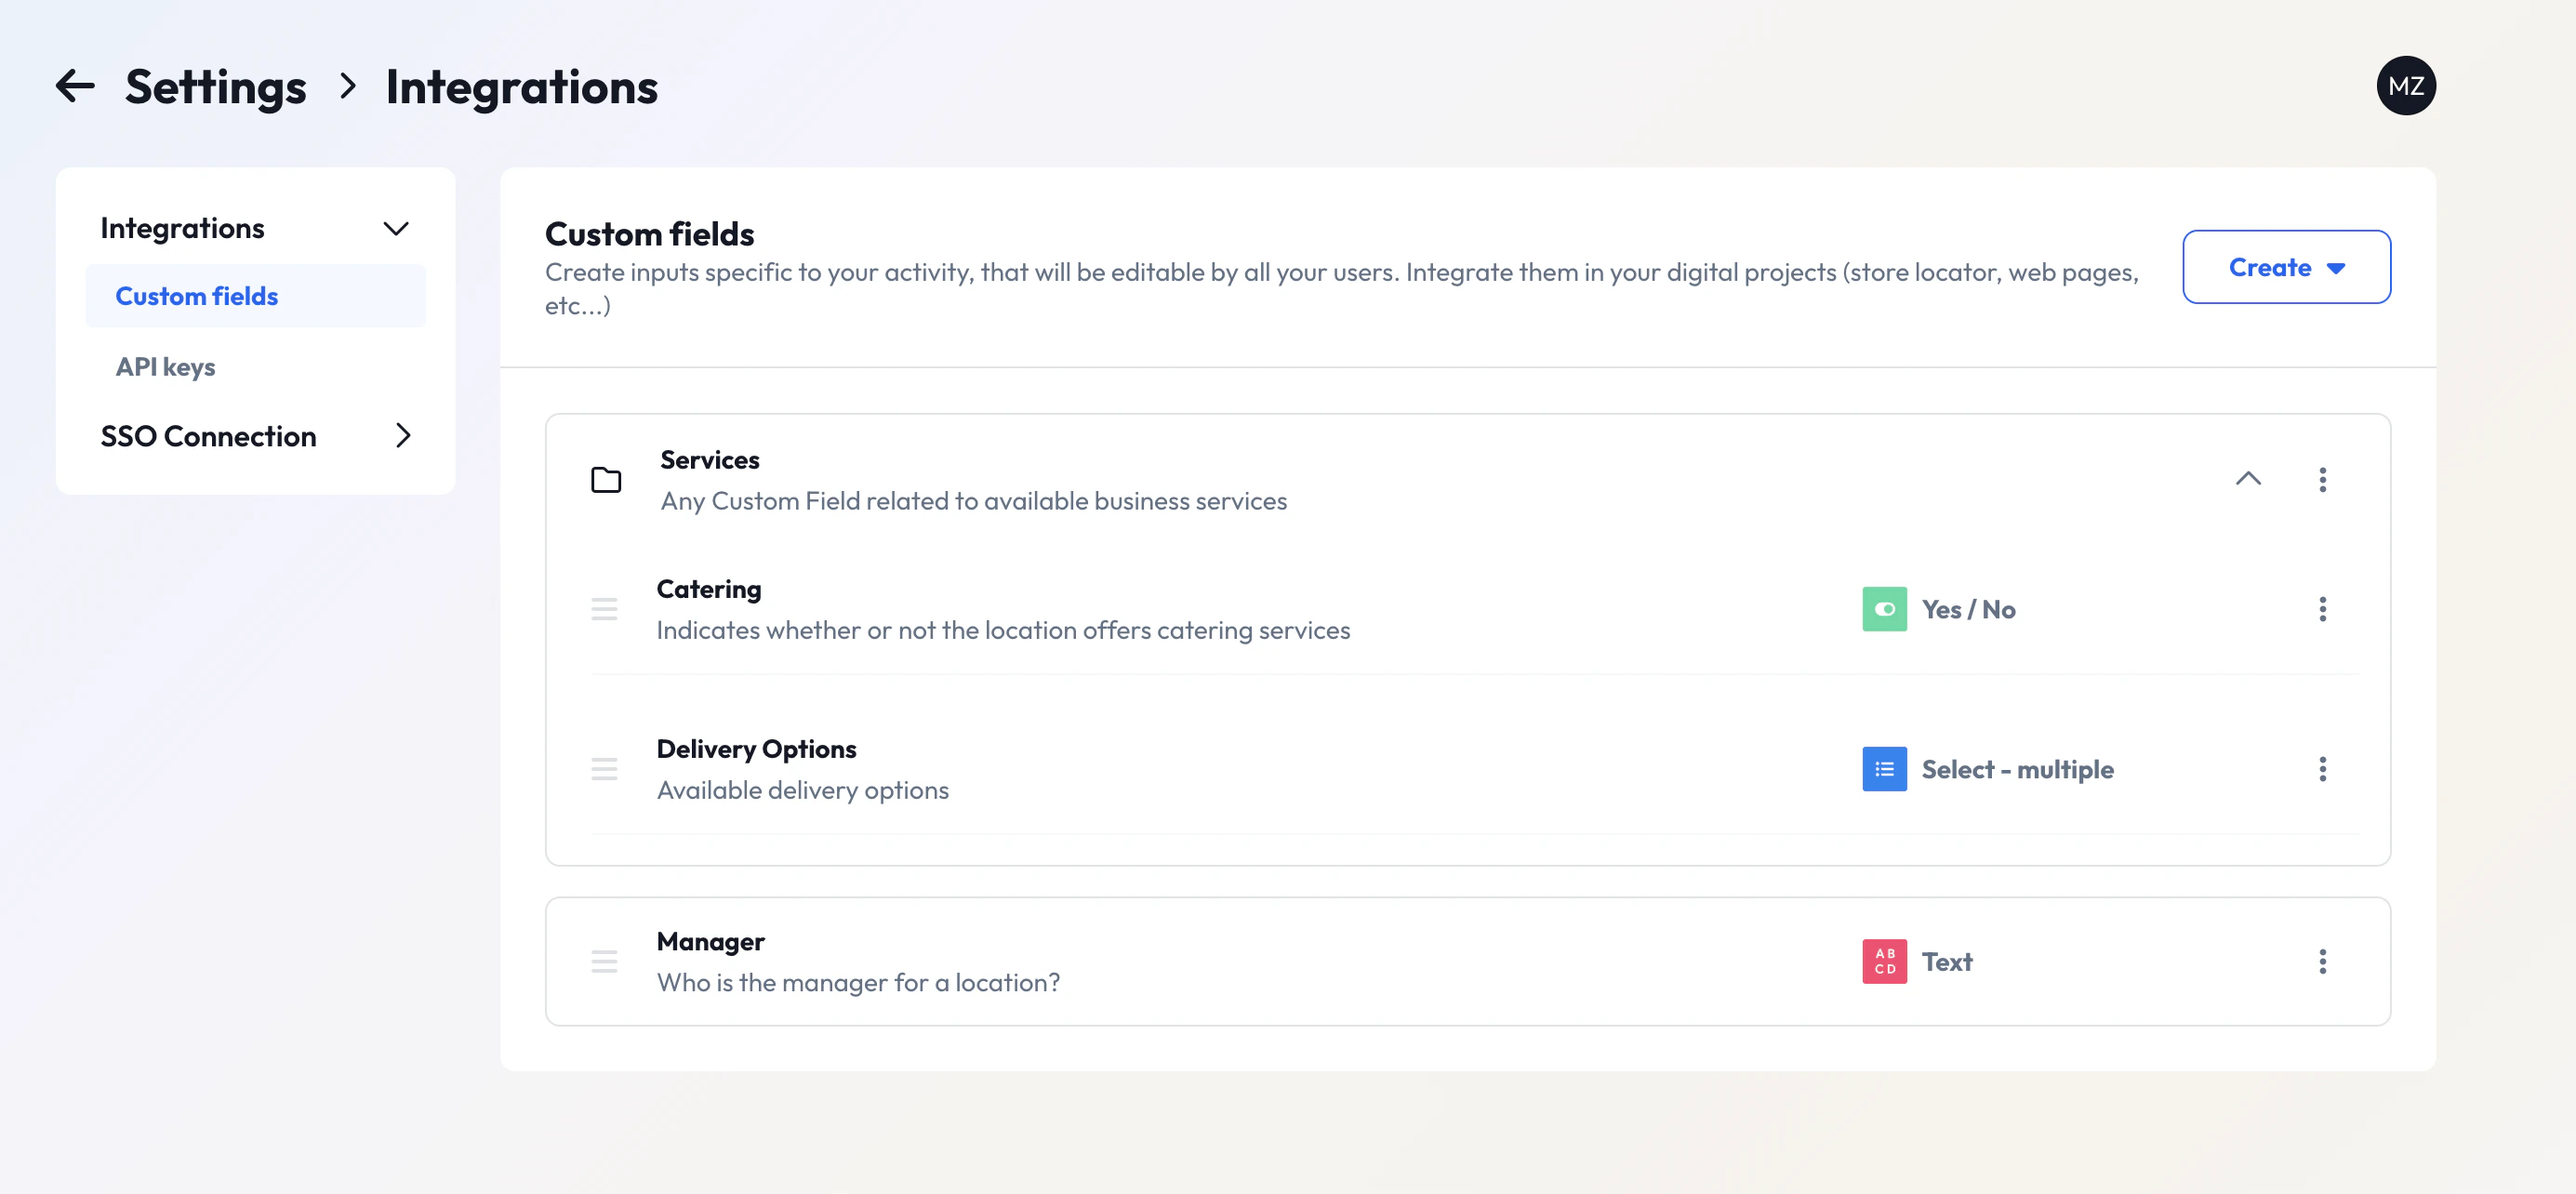 The custom fields page displays all your existing custom fields organized by sections. Each field shows its type, description, and current configuration. In the screenshot above, you can see fields like "Catering" (Yes/No type), "Delivery Options" (Select multiple), and "Manager" (Text type).
### Creating Custom Field Sections
Before creating individual fields, you can organize them into logical sections. Sections help group related fields together for better organization and user experience. Sections are optional, you can create fields without assigning them to sections.
Click the **Create** button and select the option to create a new section:
The custom fields page displays all your existing custom fields organized by sections. Each field shows its type, description, and current configuration. In the screenshot above, you can see fields like "Catering" (Yes/No type), "Delivery Options" (Select multiple), and "Manager" (Text type).
### Creating Custom Field Sections
Before creating individual fields, you can organize them into logical sections. Sections help group related fields together for better organization and user experience. Sections are optional, you can create fields without assigning them to sections.
Click the **Create** button and select the option to create a new section:
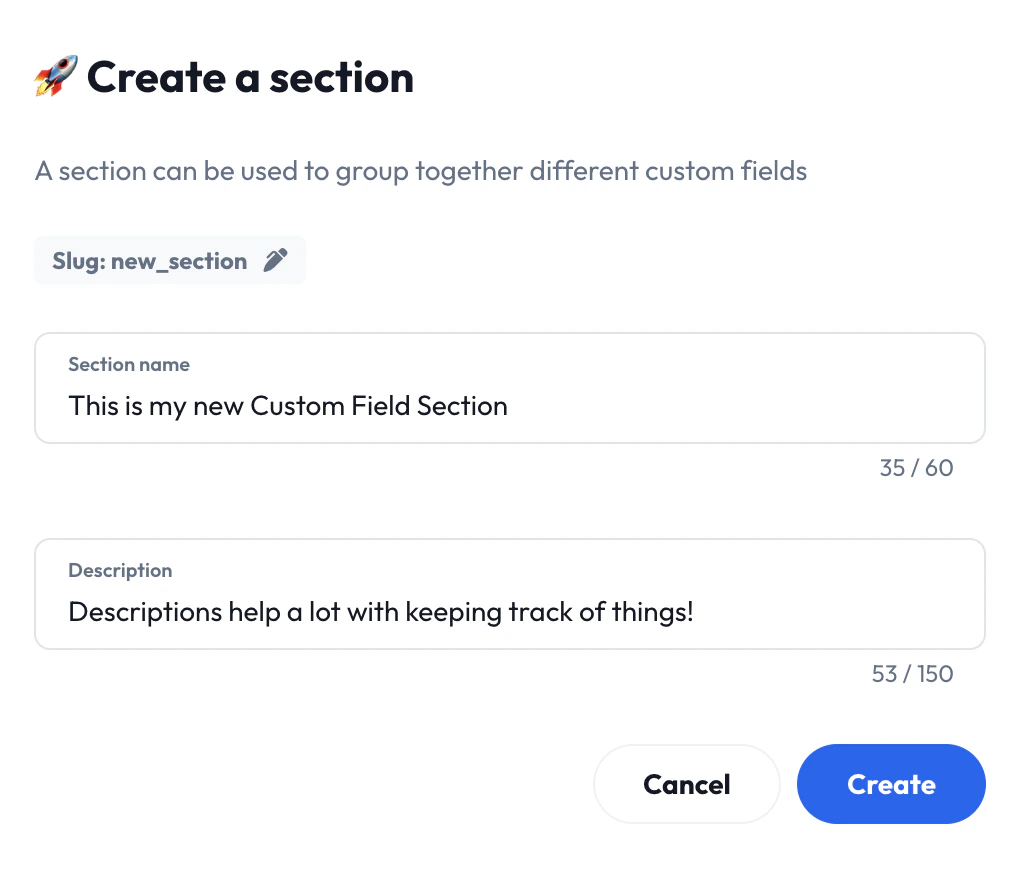 When creating a section, you'll need to provide:
* **Section name**: A descriptive title for the group of fields (e.g., "This is my new Custom Field Section")
* **Description** (optional): Details to explain the section's purpose (e.g., "Descriptions help a lot with keeping track of things!")
* **Slug** (optional): Unique identifier for the section (e.g., "new\_section")
The section will be created and available for organizing your custom fields.
### Creating Custom Fields
When creating a section, you'll need to provide:
* **Section name**: A descriptive title for the group of fields (e.g., "This is my new Custom Field Section")
* **Description** (optional): Details to explain the section's purpose (e.g., "Descriptions help a lot with keeping track of things!")
* **Slug** (optional): Unique identifier for the section (e.g., "new\_section")
The section will be created and available for organizing your custom fields.
### Creating Custom Fields
 From the custom fields page, click the **Create** button to add a new custom field:
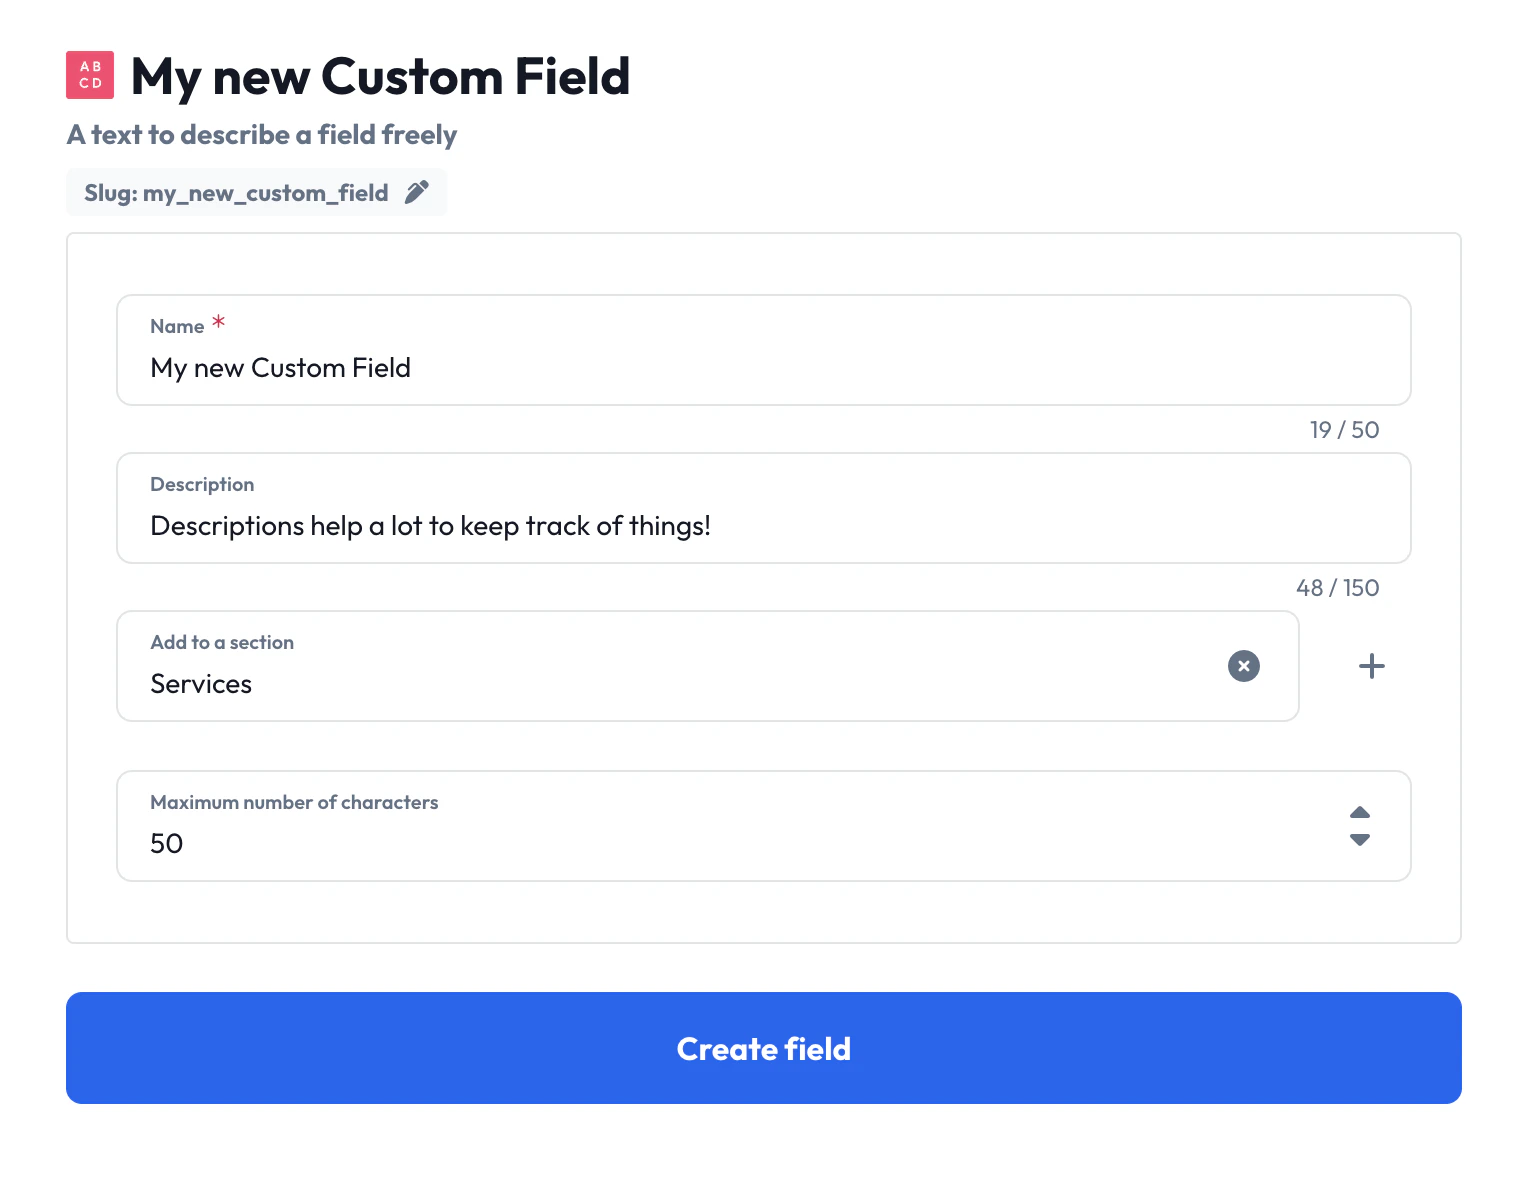 When creating a custom field, configure the following:
* **Name**: The display name for the field (e.g., "My new Custom Field")
* **Description** (optional): Help text to explain the field's purpose
* **Add to a section** (optional): Choose an existing section to organize the field (e.g., "Services")
* **Field type**: Select from available types (Text, Yes/No, Select options, etc.)
The field type determines what kind of data can be stored and how users will interact with it in the business editing interface.
* **Slug** (optional): Unique identifier for the field (e.g., "my\_new\_custom\_field")
* **Any type-specific constraints** (optional): Depending on the selected field type, you may need to configure additional options such as possible values for select fields or max length for text fields.
### Managing Existing Fields
For each custom field, you can access management options through the action menu:
When creating a custom field, configure the following:
* **Name**: The display name for the field (e.g., "My new Custom Field")
* **Description** (optional): Help text to explain the field's purpose
* **Add to a section** (optional): Choose an existing section to organize the field (e.g., "Services")
* **Field type**: Select from available types (Text, Yes/No, Select options, etc.)
The field type determines what kind of data can be stored and how users will interact with it in the business editing interface.
* **Slug** (optional): Unique identifier for the field (e.g., "my\_new\_custom\_field")
* **Any type-specific constraints** (optional): Depending on the selected field type, you may need to configure additional options such as possible values for select fields or max length for text fields.
### Managing Existing Fields
For each custom field, you can access management options through the action menu:
 Available actions include:
* **Edit**: Modify field (or section) properties, constraints, or organization
* **Delete**: Remove the field (or section) entirely (requires confirmation for fields containing existing data for at least one business)
When editing fields that already contain business data, changes may require the `force` parameter depending on whether the modification could affect any existing business data.
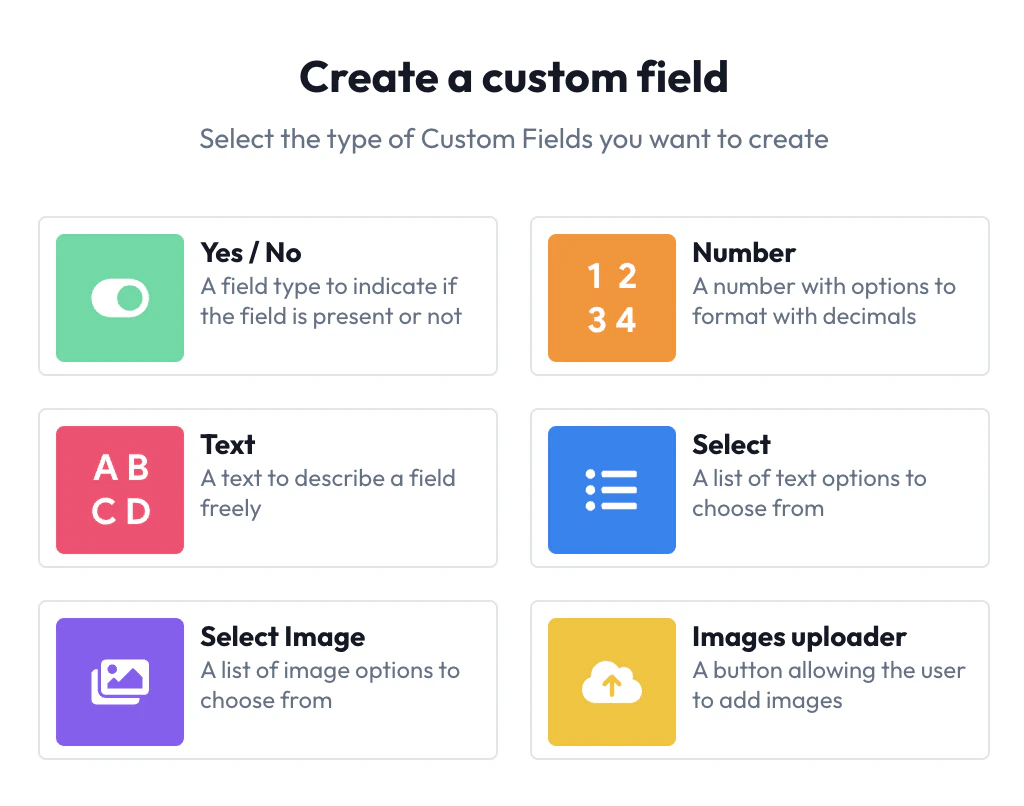
### Field Types and Configuration
The App UI supports all the same field types available through the REST API:
* **Yes/No**: A field type limited to a Yes/No option (a *boolean* field)
* **Number**: A number with options to format with decimals (integer or decimal number fields with optional constraints)
* **Text**: A text to describe a field freely (string fields with optional character limits)
* **Select**: A list of text options to choose from (single or multiple choice from predefined options)
* **Select Image**: A list of image options to choose from (multiple image choices with labels)
* **Images uploader**: A button allowing the user to add images (file upload fields for image content)
## Updating Custom Field Values for Businesses
Once custom fields are created, they can be populated with data for individual businesses through the Business Edit interface in the app.
Simply navigate to the business you would like to update, scroll to the bottom of the page to find "Custom Fields".
Available actions include:
* **Edit**: Modify field (or section) properties, constraints, or organization
* **Delete**: Remove the field (or section) entirely (requires confirmation for fields containing existing data for at least one business)
When editing fields that already contain business data, changes may require the `force` parameter depending on whether the modification could affect any existing business data.
### Field Types and Configuration
The App UI supports all the same field types available through the REST API:
* **Yes/No**: A field type limited to a Yes/No option (a *boolean* field)
* **Number**: A number with options to format with decimals (integer or decimal number fields with optional constraints)
* **Text**: A text to describe a field freely (string fields with optional character limits)
* **Select**: A list of text options to choose from (single or multiple choice from predefined options)
* **Select Image**: A list of image options to choose from (multiple image choices with labels)
* **Images uploader**: A button allowing the user to add images (file upload fields for image content)
## Updating Custom Field Values for Businesses
Once custom fields are created, they can be populated with data for individual businesses through the Business Edit interface in the app.
Simply navigate to the business you would like to update, scroll to the bottom of the page to find "Custom Fields".
 If you prefer updating your businesses using the REST API, please refer to the next section.
## REST API Operations
The Custom Fields API provides comprehensive CRUD operations for managing your organization's custom fields:
### Core Endpoints
| Operation | Endpoint | Description |
| ---------- | --------------------------------------------------------------------------------------------- | ---------------------------------- |
| **GET** | [`/api/v2/custom-fields`](/api-reference/custom-fields/get-custom-fields) | Retrieve all custom fields |
| **POST** | [`/api/v2/custom-fields`](/api-reference/custom-fields/create-custom-fields) | Create a new custom field |
| **PUT** | [`/api/v2/custom-fields/{custom_field_id}`](/api-reference/custom-fields/update-custom-field) | Update an existing custom field |
| **DELETE** | [`/api/v2/custom-fields/{custom_field_id}`](/api-reference/custom-fields/delete-custom-field) | Delete a custom field |
| **POST** | [`/api/v2/custom-fields/order`](/api-reference/custom-fields/order-custom-fields) | Reorder custom fields and sections |
### Managing Custom Field Values
Custom field values are managed through the business endpoints:
| Operation | Endpoint | Description |
| --------- | ------------------------------------------------------------------------------------ | ------------------------------------- |
| **GET** | [`/api/v2/business/{business_id}`](/api-reference/businesses/business-information) | Get business with custom field values |
| **POST** | [`/api/v2/business/{business_id}/update`](/api-reference/businesses/update-business) | Update business custom field values |
### Query Parameters
#### Force Updates
When updating or deleting custom fields, use the `force` parameter to handle destructive changes:
* `force=false` (default): Only allows non-destructive changes
* `force=true`: Allows destructive changes that may affect existing business data
For example, if you are already using a custom field named "Foo", have data saved for any businesses in that field, and you want to delete "Foo", you must set `force=true` to proceed with the update.
Decreasing the `max_allowed_values` of a multiple-select field or removing possible values from a select field also requires `force=true` if any existing business data would be affected.
## REST API Examples
In this walkthrough, we'll create a complete custom field setup for a restaurant chain that wants to track service levels and special amenities for each location. We'll start by creating the fields, then populate them with data for specific businesses, and finally make updates as needed.
### Creating Custom Fields
Let's start by creating a few custom fields that our restaurant chain will use to categorize and track additional information about their locations.
First, we'll create a single-select field to categorize our restaurants by service level:
```json theme={null}
POST /api/v2/custom-fields
{
"name": "Service Level",
"type": "SINGLE_SELECT",
"possible_values": ["Premium", "Standard", "Basic"],
"order": 1,
"section_id": null
}
```
Response:
```json theme={null}
{
"id": 101
}
```
Our field has been created with ID 101. We'll use this ID in subsequent operations.
Next, we'll add a text field for internal notes about each location:
```json theme={null}
POST /api/v2/custom-fields
{
"name": "Manager Notes",
"type": "TEXT",
"max_len": 500,
"order": 2,
"section_id": null
}
```
Response:
```json theme={null}
{
"id": 102
}
```
Finally, let's create a multiple-select field to track available amenities with custom ordering:
```json theme={null}
POST /api/v2/custom-fields
{
"name": "Available Amenities",
"type": "MULTIPLE_SELECT",
"possible_values": ["WiFi", "Parking", "Drive-Through", "Outdoor Seating", "Wheelchair Access"],
"possible_orders": [1, 3, 2, 5, 4],
"max_selected_values": 3,
"order": 3,
"section_id": null
}
```
Response:
```json theme={null}
{
"id": 103
}
```
We've limited this field to 3 selections maximum using `max_selected_values`
and specified custom display ordering with `possible_orders`. WiFi will appear
first, Drive-Through second, Parking third, followed by Wheelchair Access and
Outdoor Seating. The system will automatically generate `possible_ids` for
each option in `possible_values`.
### Retrieving Your Custom Fields
Now let's verify that our custom fields have been created successfully:
```json theme={null}
GET /api/v2/custom-fields
Response:
{
"custom_fields": [
{
"id": 101,
"name": "Service Level",
"type": "SINGLE_SELECT",
"possible_values": ["Premium", "Standard", "Basic"],
"order": 1,
"section_id": null,
"section_name": null
},
{
"id": 102,
"name": "Manager Notes",
"type": "TEXT",
"max_len": 500,
"order": 2,
"section_id": null,
"section_name": null
},
{
"id": 103,
"name": "Available Amenities",
"type": "MULTIPLE_SELECT",
"possible_values": ["WiFi", "Parking", "Drive-Through", "Outdoor Seating", "Wheelchair Access"],
"possible_ids": ["1", "2", "3", "4", "5"],
"max_selected_values": 3,
"order": 3,
"section_id": null,
"section_name": null
}
]
}
```
Perfect! All three custom fields are now available for use across our organization.
### Setting Custom Field Values on Businesses
With our custom fields created, let's populate them with data for a few restaurant locations:
Let's set custom field values for our flagship downtown location:
```json theme={null}
POST /api/v2/business/64a1b2c3d4e5f6789012345a/update
{
"custom_fields": {
"Service Level": "Premium",
"Manager Notes": "Flagship location with full-service dining and sommelier",
"Available Amenities": ["WiFi", "Parking", "Outdoor Seating"]
}
}
```
We're selecting only 3 amenities to respect the `max_selected_values: 3` constraint we set when creating this field.
Response:
```json theme={null}
{
"status": "success",
"id": "64a1b2c3d4e5f6789012345a"
}
```
Now let's configure a standard location in the suburbs:
```json theme={null}
POST /api/v2/business/64a1b2c3d4e5f6789012345b/update
{
"custom_fields": {
"Service Level": "Standard",
"Manager Notes": "Suburban location with family-friendly atmosphere",
"Available Amenities": ["WiFi", "Parking", "Drive-Through"]
}
}
```
Response:
```json theme={null}
{
"status": "success",
"id": "64a1b2c3d4e5f6789012345b"
}
```
### Updating Custom Fields
After operating for a few months, we want to expand our service level options and update some field constraints:
Let's add an "Enterprise" tier for our business-focused locations and remove the "Basic" tier:
```json theme={null}
PUT /api/v2/custom-fields/101
{
"name": "Service Level",
"type": "SINGLE_SELECT",
"created_values": ["Enterprise"],
"deleted_values": ["Basic"],
"force": false
}
```
Response:
```json theme={null}
{
"id": "success"
}
```
We've found that 500 characters isn't enough for detailed manager notes, so let's increase the limit:
```json theme={null}
PUT /api/v2/custom-fields/102
{
"name": "Manager Notes",
"type": "TEXT",
"max_len": 1000,
"section_id": null
}
```
Response:
```json theme={null}
{
"id": "success"
}
```
### Viewing Updated Business Data
Let's check how our custom field data appears when retrieving business information:
```json theme={null}
GET /api/v2/business/64a1b2c3d4e5f6789012345a
Response:
{
"id": "64a1b2c3d4e5f6789012345a",
"name": "Downtown Premium Restaurant",
"city": "New York",
"country": "US",
// ... other business fields
"custom_fields": [
{
"id": 101,
"name": "Service Level",
"type": "SINGLE_SELECT",
"value": "Premium",
"order": 1
},
{
"id": 102,
"name": "Manager Notes",
"type": "TEXT",
"value": "Flagship location with full-service dining and sommelier",
"order": 2
},
{
"id": 103,
"name": "Available Amenities",
"type": "MULTIPLE_SELECT",
"value": ["WiFi", "Parking", "Outdoor Seating"],
"possible_ids": ["1", "2", "3", "4", "5"],
"max_selected_values": 3,
"order": 3
}
]
}
```
The custom fields are now fully integrated with the business data and can be used for filtering, reporting, or integration with other systems.
### Updating Business Custom Field Values
As our business evolves, we can easily update the custom field values:
Let's upgrade our downtown location to the new "Enterprise" tier and add more detailed notes:
```json theme={null}
POST /api/v2/business/64a1b2c3d4e5f6789012345a/update
{
"custom_fields": {
"Service Level": "Enterprise",
"Manager Notes": "Flagship Enterprise location with full-service dining, sommelier, private dining rooms, and corporate catering services. Recently renovated with new kitchen equipment and expanded wine cellar."
}
}
```
Response:
```json theme={null}
{
"status": "success",
"id": "64a1b2c3d4e5f6789012345a"
}
```
Now our restaurant location has been updated to reflect the new service tier and expanded capabilities.
## Best Practices
* Use descriptive names that clearly indicate the field's purpose
* Group related fields into sections for better organization
* Set appropriate constraints (min/max values, text lengths) to ensure data quality
* Use select fields instead of text when you have a finite set of valid options
* Test field constraints with sample data before deploying
* Back up critical business data before making destructive changes
If you prefer updating your businesses using the REST API, please refer to the next section.
## REST API Operations
The Custom Fields API provides comprehensive CRUD operations for managing your organization's custom fields:
### Core Endpoints
| Operation | Endpoint | Description |
| ---------- | --------------------------------------------------------------------------------------------- | ---------------------------------- |
| **GET** | [`/api/v2/custom-fields`](/api-reference/custom-fields/get-custom-fields) | Retrieve all custom fields |
| **POST** | [`/api/v2/custom-fields`](/api-reference/custom-fields/create-custom-fields) | Create a new custom field |
| **PUT** | [`/api/v2/custom-fields/{custom_field_id}`](/api-reference/custom-fields/update-custom-field) | Update an existing custom field |
| **DELETE** | [`/api/v2/custom-fields/{custom_field_id}`](/api-reference/custom-fields/delete-custom-field) | Delete a custom field |
| **POST** | [`/api/v2/custom-fields/order`](/api-reference/custom-fields/order-custom-fields) | Reorder custom fields and sections |
### Managing Custom Field Values
Custom field values are managed through the business endpoints:
| Operation | Endpoint | Description |
| --------- | ------------------------------------------------------------------------------------ | ------------------------------------- |
| **GET** | [`/api/v2/business/{business_id}`](/api-reference/businesses/business-information) | Get business with custom field values |
| **POST** | [`/api/v2/business/{business_id}/update`](/api-reference/businesses/update-business) | Update business custom field values |
### Query Parameters
#### Force Updates
When updating or deleting custom fields, use the `force` parameter to handle destructive changes:
* `force=false` (default): Only allows non-destructive changes
* `force=true`: Allows destructive changes that may affect existing business data
For example, if you are already using a custom field named "Foo", have data saved for any businesses in that field, and you want to delete "Foo", you must set `force=true` to proceed with the update.
Decreasing the `max_allowed_values` of a multiple-select field or removing possible values from a select field also requires `force=true` if any existing business data would be affected.
## REST API Examples
In this walkthrough, we'll create a complete custom field setup for a restaurant chain that wants to track service levels and special amenities for each location. We'll start by creating the fields, then populate them with data for specific businesses, and finally make updates as needed.
### Creating Custom Fields
Let's start by creating a few custom fields that our restaurant chain will use to categorize and track additional information about their locations.
First, we'll create a single-select field to categorize our restaurants by service level:
```json theme={null}
POST /api/v2/custom-fields
{
"name": "Service Level",
"type": "SINGLE_SELECT",
"possible_values": ["Premium", "Standard", "Basic"],
"order": 1,
"section_id": null
}
```
Response:
```json theme={null}
{
"id": 101
}
```
Our field has been created with ID 101. We'll use this ID in subsequent operations.
Next, we'll add a text field for internal notes about each location:
```json theme={null}
POST /api/v2/custom-fields
{
"name": "Manager Notes",
"type": "TEXT",
"max_len": 500,
"order": 2,
"section_id": null
}
```
Response:
```json theme={null}
{
"id": 102
}
```
Finally, let's create a multiple-select field to track available amenities with custom ordering:
```json theme={null}
POST /api/v2/custom-fields
{
"name": "Available Amenities",
"type": "MULTIPLE_SELECT",
"possible_values": ["WiFi", "Parking", "Drive-Through", "Outdoor Seating", "Wheelchair Access"],
"possible_orders": [1, 3, 2, 5, 4],
"max_selected_values": 3,
"order": 3,
"section_id": null
}
```
Response:
```json theme={null}
{
"id": 103
}
```
We've limited this field to 3 selections maximum using `max_selected_values`
and specified custom display ordering with `possible_orders`. WiFi will appear
first, Drive-Through second, Parking third, followed by Wheelchair Access and
Outdoor Seating. The system will automatically generate `possible_ids` for
each option in `possible_values`.
### Retrieving Your Custom Fields
Now let's verify that our custom fields have been created successfully:
```json theme={null}
GET /api/v2/custom-fields
Response:
{
"custom_fields": [
{
"id": 101,
"name": "Service Level",
"type": "SINGLE_SELECT",
"possible_values": ["Premium", "Standard", "Basic"],
"order": 1,
"section_id": null,
"section_name": null
},
{
"id": 102,
"name": "Manager Notes",
"type": "TEXT",
"max_len": 500,
"order": 2,
"section_id": null,
"section_name": null
},
{
"id": 103,
"name": "Available Amenities",
"type": "MULTIPLE_SELECT",
"possible_values": ["WiFi", "Parking", "Drive-Through", "Outdoor Seating", "Wheelchair Access"],
"possible_ids": ["1", "2", "3", "4", "5"],
"max_selected_values": 3,
"order": 3,
"section_id": null,
"section_name": null
}
]
}
```
Perfect! All three custom fields are now available for use across our organization.
### Setting Custom Field Values on Businesses
With our custom fields created, let's populate them with data for a few restaurant locations:
Let's set custom field values for our flagship downtown location:
```json theme={null}
POST /api/v2/business/64a1b2c3d4e5f6789012345a/update
{
"custom_fields": {
"Service Level": "Premium",
"Manager Notes": "Flagship location with full-service dining and sommelier",
"Available Amenities": ["WiFi", "Parking", "Outdoor Seating"]
}
}
```
We're selecting only 3 amenities to respect the `max_selected_values: 3` constraint we set when creating this field.
Response:
```json theme={null}
{
"status": "success",
"id": "64a1b2c3d4e5f6789012345a"
}
```
Now let's configure a standard location in the suburbs:
```json theme={null}
POST /api/v2/business/64a1b2c3d4e5f6789012345b/update
{
"custom_fields": {
"Service Level": "Standard",
"Manager Notes": "Suburban location with family-friendly atmosphere",
"Available Amenities": ["WiFi", "Parking", "Drive-Through"]
}
}
```
Response:
```json theme={null}
{
"status": "success",
"id": "64a1b2c3d4e5f6789012345b"
}
```
### Updating Custom Fields
After operating for a few months, we want to expand our service level options and update some field constraints:
Let's add an "Enterprise" tier for our business-focused locations and remove the "Basic" tier:
```json theme={null}
PUT /api/v2/custom-fields/101
{
"name": "Service Level",
"type": "SINGLE_SELECT",
"created_values": ["Enterprise"],
"deleted_values": ["Basic"],
"force": false
}
```
Response:
```json theme={null}
{
"id": "success"
}
```
We've found that 500 characters isn't enough for detailed manager notes, so let's increase the limit:
```json theme={null}
PUT /api/v2/custom-fields/102
{
"name": "Manager Notes",
"type": "TEXT",
"max_len": 1000,
"section_id": null
}
```
Response:
```json theme={null}
{
"id": "success"
}
```
### Viewing Updated Business Data
Let's check how our custom field data appears when retrieving business information:
```json theme={null}
GET /api/v2/business/64a1b2c3d4e5f6789012345a
Response:
{
"id": "64a1b2c3d4e5f6789012345a",
"name": "Downtown Premium Restaurant",
"city": "New York",
"country": "US",
// ... other business fields
"custom_fields": [
{
"id": 101,
"name": "Service Level",
"type": "SINGLE_SELECT",
"value": "Premium",
"order": 1
},
{
"id": 102,
"name": "Manager Notes",
"type": "TEXT",
"value": "Flagship location with full-service dining and sommelier",
"order": 2
},
{
"id": 103,
"name": "Available Amenities",
"type": "MULTIPLE_SELECT",
"value": ["WiFi", "Parking", "Outdoor Seating"],
"possible_ids": ["1", "2", "3", "4", "5"],
"max_selected_values": 3,
"order": 3
}
]
}
```
The custom fields are now fully integrated with the business data and can be used for filtering, reporting, or integration with other systems.
### Updating Business Custom Field Values
As our business evolves, we can easily update the custom field values:
Let's upgrade our downtown location to the new "Enterprise" tier and add more detailed notes:
```json theme={null}
POST /api/v2/business/64a1b2c3d4e5f6789012345a/update
{
"custom_fields": {
"Service Level": "Enterprise",
"Manager Notes": "Flagship Enterprise location with full-service dining, sommelier, private dining rooms, and corporate catering services. Recently renovated with new kitchen equipment and expanded wine cellar."
}
}
```
Response:
```json theme={null}
{
"status": "success",
"id": "64a1b2c3d4e5f6789012345a"
}
```
Now our restaurant location has been updated to reflect the new service tier and expanded capabilities.
## Best Practices
* Use descriptive names that clearly indicate the field's purpose
* Group related fields into sections for better organization
* Set appropriate constraints (min/max values, text lengths) to ensure data quality
* Use select fields instead of text when you have a finite set of valid options
* Test field constraints with sample data before deploying
* Back up critical business data before making destructive changes